Crazy as it sounds, I have 3 blogs running at the same time. I do this to keep things organized...but it can be a mess. I read about a pretty cool Web 2.0 application from Yahoo called "Pipes". Pipes is an easy to use scripting system for web content presentation. It allows you to, for example, combine multiple RSS feeds into a single feed. You can add filters and other operators to the output and create your own personalized web feed.
I personally jumped on this because I wanted to find a way to combine my multiple blogs into a single feed so I could share it on Facebook. The issues is that Facebook naively allows you to import a blog into your notes section and share it, but that only works for a single blog.
For those interested, here's what you can do to import your blog into facebook.
right click on your facebook menu (bottom left, it's the button that says applications).
Click on notes and make sure that you are looking at "my notes" not someone else's notes. The tab at the top of the section will give you directions here.
on the right you should see a box that says "Notes Settings". There is a link below this that says "import blog". just click on that link and fill in the url for your blog site. once you do this, your blog will automatically post to Facebook.
Now, if you are like me and you want to combine some blogs, here is what you can do.
go to http://pipes.yahoo.com
Sign in with your yahooID, or create an account.
click on the "create a pipe" button.
You'll be presented with what looks like a graph pad on the right side and some buttons on the left. the idea is to drag the button from the left side to the work area and then link them together. There's a lot of cool stuff that you can do with this, but for this post, I'm focusing on combining blog posts.
first, at the very top of the work area you will see a tab that says 'untitled'. Click on that and type a name for your project. use a good name, since this will be the name of your combined blog. let's call it "MultiFeed".
now on the left open up the 'sources' section if it's not already open. select "fetch site feed" and drag it onto the the work area.
note that this will also create a "pipe output" button in the work area.
In the fetch site feed button there is a box next to a "-" button. this is where you type the url for your blog.
to add more blogs click the "+" button on the left side of the "fetch site feed" button. I'm not sure what the limit to the number of feeds is, but I put in 3 urls with no issue.
Now just click on the round radio button at the bottom of the "fetch site feed" box and drag the connector that you are creating over or down to the "pipe output" button.
You should see some debugging information in a lower panel of the work area. you can use this to debug any errors that you might be getting. If you did this correctly, then the debugger should be showing the titles for some or all of your blog posts. you can now "save" your pipes.
now in the top middle of the work area there is a link called "run pipe...". Click this and you should get a new window that shows your combined feeds.
I noticed that it put the posts in alphabetical order, so i decided to sort them by post date.
to do this, go back to your work area "edit source"
on the left under "operators" select "sort" and drag it into the field below your "fetch site feed" box.
Now using your cursor, connect the feeds box to the sort box and the sort box to the output box. just click on radio button and drag the pipes to make the connections.
in the "sort" box, there is a drop down next to the "-" sign. Click that and select "item.pubDate", and then select "descending" in the box to the right.
You should now have 3 boxes on the screen. 1) your url feeds all listed together in one box, 2) your sort box with item.pubDate selected and 3) your pipe output. "SAVE"
That should be all you need to do. Now check your pipes with "run pipe...". It should look right now.
now you can clean up your pipes output page.
In the "my pipes" section you should see your pipe "multifeed" lists. click that and see your pipe. now click on "click to add description" and add a description if you want.
You will see below the name a line called "pipe web address". This is the address that your "multifeed" will be published under.
Below the address line are 4 boxes, click on the "publish" button. You'll get a pop-up. click on accept and you are done.
copy the web address for the pipe and paste it into the facebook import selection that i spoke of earlier.
that's it.
Thursday, September 24, 2009
Saturday, September 12, 2009
DVD burning made easy
I often have a need to backup my DVD movies. I have three kids (under the age of 8) and they love to eat, mash, throw and generally abuse anything that looks even closely like a Frisbee.
I don't plan to discuss the legal ramifications of copying DVDs. Philosophically, I believe that what I buy is mine and I can do what I like with it...but that's a discussion for another time.
The general idea here is to take a master copy (primary DVD) and duplicate it to a piece of blank DVD media.
What you will need:
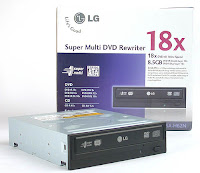
1) DVD recorder. They are pretty cheap now, so you should be able to get one for around $50 on sale. Get the fastest one you can. Speeds are described in terms of multiples. so 2x, 4x 10x all describe the number of times that reader is faster than the first generation DVD reader that came out. I'm currently using an 18X LG DVD GSA-H62N. It's a SATA DVD recorder and has worked quite well for me.
2) Next you need blank media: There is a lot of discussion on the web about what media to buy. Lots of brands and lots of types. I am not an expert on this. I buy Tayio Yuden from http://www.supermediastore.com/
my last order looked like this:
SuperMediaStore Taiyo DV-001-2763 1 32.99
Yuden Silver Thermal
Lacquer 16X DVD-R Media
100 Pack (Premium Line)
in Tape Wrap
I can recommend these for your standard everyday copying. They are cheap and reliable. The disks are DVD5 so they hold about 5GB (4,500MB really) of information. They are DVD-R, which is compatible with most players. They are single layer.
Most commercial DVDs are more than 5GB. they are generally in the 9GB range. When I backup movies, I generally just compress them a bit more and take out extra stuff to have them fit on this size media. If you want to backup the entire disk at best quality with no loss, then you should be Dual layer DVD-R media. I have Ridata 8X DL DVD-R disks that work just fine. Do some research if you are interested in buying the best media possible. Better media means longer lasting DVDs (yes DVD media will degrade and eventually become unusable just sitting on a shelf). Better media will also burn more reliably with fewer errors.
3) Software: There are a thousand different brands of DVD copying software out on there. I think US law has kept many of them out off the market here (not really sure though). I will concentrate on the ones that I use. You need two things first, a CSS decrypter which will break the copy protection on the DVD and then a program that will copy the data from the original to the backup. Some free examples are: DVDshrink, DVDfab, DVD decrypter. http://www.downloadatoz.com/howto/top-free-dvd-ripper.html. I used to use DVD shrink, but I don't anymore. I've found that the most reliable combination for me comes from Elaborate Bytes and is called CloneDVD. It's easy to use and they update it regularly. Clone DVD is the Copying software. In addition to this you need the decrypter. I use Slysoft's anyDVD. It's sits runs all the time in your system and detects and decrypts AnyDVD you put in your DVD drive. Both can be found at http://www.slysoft.com/. They cost money, but for me, this was the absolute best choice for ease of use and reliability.
I don't plan to discuss the legal ramifications of copying DVDs. Philosophically, I believe that what I buy is mine and I can do what I like with it...but that's a discussion for another time.
The general idea here is to take a master copy (primary DVD) and duplicate it to a piece of blank DVD media.
What you will need:
1) DVD recorder. They are pretty cheap now, so you should be able to get one for around $50 on sale. Get the fastest one you can. Speeds are described in terms of multiples. so 2x, 4x 10x all describe the number of times that reader is faster than the first generation DVD reader that came out. I'm currently using an 18X LG DVD GSA-H62N. It's a SATA DVD recorder and has worked quite well for me.

2) Next you need blank media: There is a lot of discussion on the web about what media to buy. Lots of brands and lots of types. I am not an expert on this. I buy Tayio Yuden from http://www.supermediastore.com/
my last order looked like this:
SuperMediaStore Taiyo DV-001-2763 1 32.99
Yuden Silver Thermal
Lacquer 16X DVD-R Media
100 Pack (Premium Line)
in Tape Wrap
I can recommend these for your standard everyday copying. They are cheap and reliable. The disks are DVD5 so they hold about 5GB (4,500MB really) of information. They are DVD-R, which is compatible with most players. They are single layer.
Most commercial DVDs are more than 5GB. they are generally in the 9GB range. When I backup movies, I generally just compress them a bit more and take out extra stuff to have them fit on this size media. If you want to backup the entire disk at best quality with no loss, then you should be Dual layer DVD-R media. I have Ridata 8X DL DVD-R disks that work just fine. Do some research if you are interested in buying the best media possible. Better media means longer lasting DVDs (yes DVD media will degrade and eventually become unusable just sitting on a shelf). Better media will also burn more reliably with fewer errors.
3) Software: There are a thousand different brands of DVD copying software out on there. I think US law has kept many of them out off the market here (not really sure though). I will concentrate on the ones that I use. You need two things first, a CSS decrypter which will break the copy protection on the DVD and then a program that will copy the data from the original to the backup. Some free examples are: DVDshrink, DVDfab, DVD decrypter. http://www.downloadatoz.com/howto/top-free-dvd-ripper.html. I used to use DVD shrink, but I don't anymore. I've found that the most reliable combination for me comes from Elaborate Bytes and is called CloneDVD. It's easy to use and they update it regularly. Clone DVD is the Copying software. In addition to this you need the decrypter. I use Slysoft's anyDVD. It's sits runs all the time in your system and detects and decrypts AnyDVD you put in your DVD drive. Both can be found at http://www.slysoft.com/. They cost money, but for me, this was the absolute best choice for ease of use and reliability.

4) Disk space -- You will need at least 10GB of free disk space depending on what and how you are copying the DVD. All of the data is first written to a temp directory on your hard drive before being copied to your blank media.
Once you have all this. Copying is really easy.
Just install the software. CloneDVD is a basic install. AnyDVD requires a restart.
Put your Master DVD into your DVD recorder and wait. You will notice the anyDVD icon on the bottom right (looks like a red fox). It will either be sort of light in color, meaning nothing detected, or darker meaning decrypted. Give it a good minute to get the job done once you first put the DVD in the drive.
Now open up CloneDVD. You have 3 options, 1) copy titles, 2) Clone DVD, 3) write existing data. Generally you will use either 1) or 2). the first option allows you strip out everything on the DVD except the main movie. Option 2 does a complete 1:1 duplication of the DVD. I generally just pick option 1, since i don't care about most of the other junk on a DVD.
Which ever you pick hit next.
On the top there will be a bar that reads "DVD video files", click the icon to the right of that. the one with the arrows. This will open up a folder browser. Pick your DVD player from the list. the next time you do this, you can just click the little down arrow.
Now the screen will fill up with 2 main sections. one that says "information/Preview" and one for "video titles". information is just that...information about the items you select under video titles. each item has a check box. If you chose to clone the DVD then everything will be selected.
NOTE: on the bottom left corner under the "video titles" pane there is a little box with a drop down that will read something like DVD-5 or DVD-R/DL etc. if you have a normal single layer DVD then you need to select custom and type in 4500 as the capacity. This will keep you from overburning DVD media and creating pancakes.
In this section you can also see a quality bar (green to red in color with an arrow) this tells you the quality you can expect to burn this DVD at. everything is calculated based on the original size of the master DVD and the capacity of your media. The software will automagically compress the title to fit in the capacity you have for the media...but this will sacrifice quality...so choose wisely.
This is the point where i decide if i want to clone a DVD (if i have enough space), use larger media like a dual layer disk (9000MB) or cut out extra parts to make it fit. you can take out camera angles and the movies with director's comments etc.
QUALITY: Generally, for me, I'm ok with movies that car compressed down to the yellow part of the quality bar...I don't really notice a difference. You might.
the preview pane is nice here for looking at the different versions of movies that are listed. It will help you figure out what you can cut out. Also look at the information panel to see which ones are 16:9 aspect ratio versus 4:3.
Click next.
here you get to choose which audio streams to include and subtitles. I ALWAYS REMOVE ALL SUBTITLES!!. The reason is that sometimes when you leave them in, they will run through the entire movie...no option to turn them off. If you cloned the DVD it's never really an issue, but if you just copied a movie out and got rid of the title menus then you can't go in an unselect the subtitles. Again, I'm not an expert here. You can play with this option. in some movies there are forced subtitles for situations where the characters are speaking a different language and the director wants you to know what they are saying. These will often get cut if you take out all of the subtitles. Play with this option to figure out what works for you and your player.
In addition to subtitles you need to choose audio streams. I generally leave in all of the english streams, DTS and Dolby AC3 for surround. I'll even include stereo streams if they have them. But I will cut out directors comments.
You will notice that there is a quality bar here again.
Click next.
Now you are at the "Output method".
Your DVD recorder should be listed under "DVD writer" so select that. in preferred speed pick the one that works the most reliably for you.
NOTE ON SPEED: The blank media you buy will have a listed speed, as will the recorder you bought (8X, 10x etc...) the lowest speed of the two will be your MAX burning speed. I generally burn at slower speeds than my MAX for reliability. I like to burn at 8X even though my recorder and media are rated at 18X. It takes a little longer, but i'm not in any rush.
In this selection you can also pick the location for your temp files. If you have more than one hard drive, then put the temp files on the drive that doesn't contain your OS, assuming it's still a fast drive. for example, if you have 2 sata hard drives, choose drive D: for you temp space. If you have a SATA and an IDE drive, then pick the SATA drive.
I generally leave the check box for deleting temp files UNCHECKED, so that my last burned DVD will still be there on the hard drive after I'm done. This way if you mess up the burn, you can redo it and if you want to convert it for your ipod, it's right there ready for you.
Now click GO!
This will start the copy process. you can watch clips by selecting the snapshot tab, or just sit back and wait.
They program will automatically eject the master copy when it's completely read. It will then ask you to put in the blank media. close the door once you put your DVD in the tray and it will start to copy the files to your blank media.
Once it's done it will pop up a screen that says it's done and hit "eject".
Done! You should have a perfect copy of the original disk.
I generally write on the top of the DVD with a sharpie. I write the title, date of the movie, playtime and rating...all for my reference later.
that's all you need to do. You are done.
NOTE: some gotchas that I have seen:
1) if you put your master DVD in and don't wait long enough for AnyDVD to decrypt it, you will get an error in the second step that says your DVD is encrypted. just wait a little longer.
2) if you still get the error, then you need to open up the anyDVD software and see what drive it's trying to decrypt. Right click on the fox icon, click settings, click drives, then selection. There should be a check box next to your DVD writer. If there are checks next to other drives, just uncheck them. If you didn't restart after installing anydvd, you need to do that. if all else fails post here or get help from slysoft.
3) Media read errors. If your master is scratched you can get read errors. If the scratches are bad you might not be able to copy the DVD. you can ignore a few errors, but if you there are too many, you will likely be creating a pancake.
4) if you notice playback is pixelated or muddy, then you compressed with the quality below your personal threshold. Use a dual layer disk, remove more content or lower your expectations.
5) if you notice the dvd stuttering or stopping during playback, check and clean the DVD player. Try playing it in a different player. Clean the disk (smudges, finger prints etc). If it's scratched, make a new copy.
6) failed writes. this generally happens if your media is bad or your hard drive is too slow or something bad is going on with your system.
Monday, September 7, 2009
Turning .DTS files into an Audio CD
So I've come across some interesting files on the internet. They are .DTS files, which, I believe are the ripped contents of my MTV Unplugged DVD of Nirvana. It's an awesome DVD that sounds great. The only issue is that I can't play audio DVDs in my car...Well that's not exactly true. I can play them, but the car has to be stopped and the parking brake has to be on to start the DVD. Not very convenient.
The .DTS files are the ripped DTS formatted files from the DVD, which is a nice start, but I wanted to turn these into an Audio CD with DTS surround sound. It was a long journey and I won't bore you with all the details, but I will give you the simple (not really simple) way that I solved the problem.
The problem: You can't rip .DTS files that are sampled at 48Khz directly to a CD. You will get an error in the recording software (Nero etc) that says you can't record these in redbook audio. This makes sense, since the redbook format only supports 44.1Khz sample rate.
I couldn't find a simple program to just take the DTS file and re-encode it to a .WAV file with 44.1Khz. I'm still looking for a way to reauthor a DVD that will just auto run in my DVD player, but until that happens this is my next best thing.
So, here what you need to make this work:
.DTS Files Encoded with 6 channel audio
Tranzcode_v0.30_guiv1.4.rar
Audio Commander
Surcode DVD-DTS
Nero Burning ROM
Most of this stuff is a simple websearch away. I'm lazy, so I haven't put up the links. But search and you will find them.
Step 1. -- Break the .DTS file into it's constituent parts with Tranzcode. If you have the tranzcode GUI, then it's as easy as selecting the .DTS file as the input. Check the 6 channel radio button and hit 'RUN'.
Step 2. -- Open up audio commander. On the bottom left where it says 'uncompressed' select frequency [44khz]. channels = mono, bit depth=16-bit... Now on the left select add files. Choose the wav files that were created in step 1. You can add them all at once. now go to [file]-->[convert]. This stalled a couple times for me. not sure why. I just aborted and restarted. It should only take a minute or so to convert all you wav files. This will convert your files from 48khz to 44.1 khz. make sure you select a differnt directory to put them in, just to keep things in order.
Step 3. -- Open surcode. here you add the files that you converted from step 2. Do it in this order...I did and it worked fine. a) sample rate set to 44.1, b) click the 'left front' button. c) select the file from step 2 that has "FL" at the end. d) select the 'RF' file for right front. e) go down the list and fill in the rest of the files. Double check to make sure that you have all 6 channels in the right spots. Encode time should be 0:00:00:00. don't mess with it. Stop time should have automatically set to the time from the Wav files. Don't mess with it. Now go to Destination and type in the name of the file that you are saving. For speed I just copied the song name during an earlier process and it pasted it here. Make sure the destination folder is, again, a differnt folder so you don't get things messed up. I would suggest at the onset having a 'DTS' folder, a '48khz' folder, a '44khz' folder and a 'final' folder. If you did this right and chose the right destination folder, then you should have the newly encoded 44.1khz wav files all tucked away in your 'final" folder.
Step 4. -- Open up nero express. Choose the music option. choose Audio CD. now just copy and paste, or drag your WAV files into the new project box. Make sure that you aren't going over the 80 minutes allowed on the CD. Put a blank CD in the drive and hit burn.
Once this is complete...if you did it right. You will have a DTS Audio CD with 6 channel surround. It worked great for me, though it is a real pain in the butt. It take a long while to do all the re-encoding. I wish there were a "one-step" program that could do all this for me, but since I haven't found that...this is what I will use.
Please note that this creates Digital DTS Audio. THIS IS NOT A STANDARD CD FORMAT!!! You cannot play this on a regular CD player and expect it to play. You will hear a loud hissing sound. That's because the normal Right and Left outputs from the CD channels are used to hold the surround information. The only way this will work is:
1) play it on your PC with the correct software (CyberPower DVD, VLC DVD etc...with DTS plug-ins)
2) Play it on a CD player that has a SPDIF for Digital out. This has to be connected to the digital in of a receiver that supports DTS surround playback.
3) Play it on a DVD player that supports DTS surround...you will likely need a DTS receiver or have a DVD player with 6 channel speaker outs or 6 channel line outs for a receiver.
In my case, my car has a DVD play that supports DTS surround (lucky me). and it works great!!
You have to listen to:
Sting - Brand New Day
Nirvana unplugged
They are awesome in DTS.
Subscribe to:
Posts (Atom)